Kitchen Renovation: BeforE

This was the estate listing photo of our kitchen taken from adjacent to the original maid’s staircase and looking towards the “butler’s pantry” which, at the time we bought the house in early 2016, had been turned into the laundry room. From the beginning, we knew we wanted the laundry in the basement and to use the butler’s pantry for its intended purpose.

The estate listing photo looking from the entrance to the kitchen towards the back door. At the time we bought the house, there was extensive damage to the brick façade just outside this door. Eventually we decided to incorporate a room addition into the façade repair and that work has just now barely commenced. When it’s complete, this door will be removed and the opening will be a pass-through to a dining room/home bar.

An estate photo that was taken from inside the home’s original dining room and looking into the butler’s pantry and kitchen. We decided to use the dining room as a den, which would allow us to have a formal parlor free of technology and a separate space for the television.

This photo was taken in the fall of 2016, 4 to 5 months after we moved in. Nothing in the kitchen other than some of the plaster walls was original. We believe the latest remodel was in the late 70’s or early 80’s.

Here we are on December 26, 2016, the night before we demolished the kitchen. This photo was taken at the entrance to the kitchen just outside the entry hall. The layout of the new kitchen would be driven by a freestanding period reproduction stove we had purchased on eBay while still living in California. We had no idea if the stove would fit, so when we first arrived in Michigan in May 2016 with truckloads of furniture and four dogs, the first order of business was to measure the area where this “island” sits to ensure the stove would fit. With our fingers crossed. And it did, perfectly.
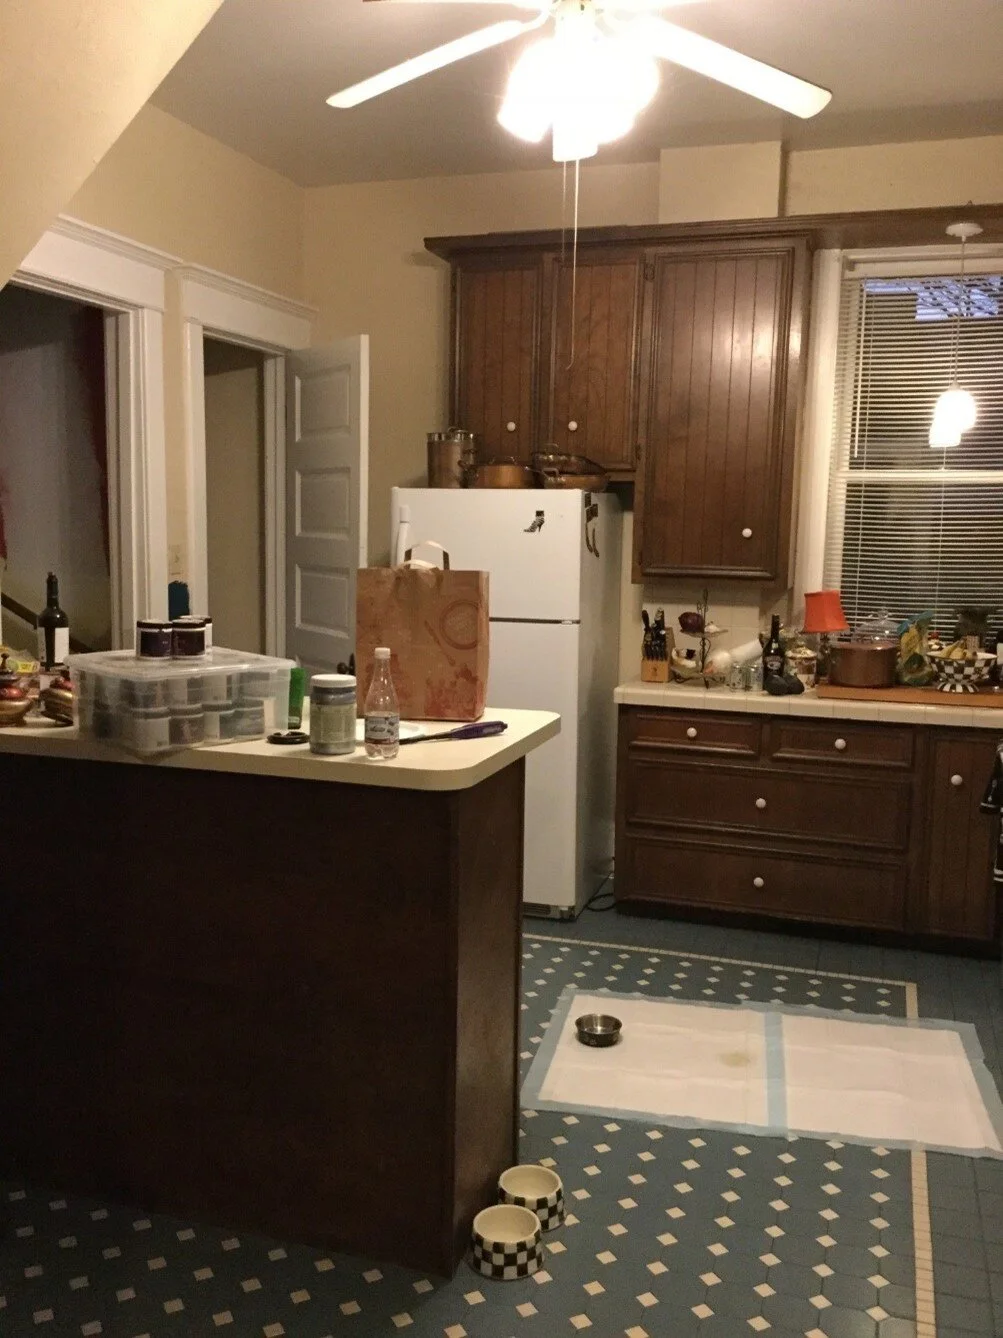
This photo was taken on December 26, 2016, looking from the butler’s pantry towards the island. The doorways behind the island lead to the maid’s staircase going to the second floor and to stairs going down to the basement. By this time, we’d used the space enough to know we didn’t want upper cabinets cluttering and weighing down the space in our redesigned kitchen.

This photo shows the maid’s staircase leading to the second floor. We intended to patch and paint this stairwell, replace the rickety handrail and either paint or carpet the stairs. Ultimately, we opted for carpet due to the steepness and treachery of the stairs and the associated slip factor (both of us tumbled down these stairs more than once before they were carpeted).

This photo was taken at the termination of the entry hall looking into the kitchen. The cabinets on the right are extremely shallow, so we decided we’d tear out the partial wall to the right and build this area out as a free-standing pantry that would look like an armoire. You can also see partials of three of our dogs, including our terrier Roxy and two of our three Maltese, Hannah and Levi aka Bees.

This photo looks from the kitchen through the butler’s pantry (laundry room) towards the first-floor bathroom. The bathroom, which was a tiny room with three pieces crammed into it, is not original to the house and from what we can glean was added during the last 20 years or so.

I took this photo while standing in the first-floor bathroom looking through the butler’s pantry (bastardized into a laundry room) into the kitchen. We’d determined, by this point, we’d remodel the bathroom as a two-piece to function as a powder room only. We didn’t want the inconvenience and clutter of a shower just off the kitchen on a floor that has no bedrooms.

Here we have the butler’s pantry (laundry room) taken from the entry to the dining room (now den). I understood the convenience factor of a first-floor laundry but was unwilling to tolerate ugliness for the sake of convenience. So down to the basement the laundry would go. Moreover, we wanted to maximize counter space in the main kitchen area, and we concluded the best way to do this would be to put our refrigerator in the butler’s pantry.

Speaking of ugly, the ceilings of both the kitchen and the butler’s pantry needed substantial work. This drop ceiling would need to go as would the boob light.

As for the kitchen, we intended to replace the ceiling fan with a pretty chandelier. Ultimately, we also decided to put molding on the ceiling to give it much-needed character, especially since neither a crown molding nor tin was feasible due to angles created by the maid’s staircase overhead.
Design Process

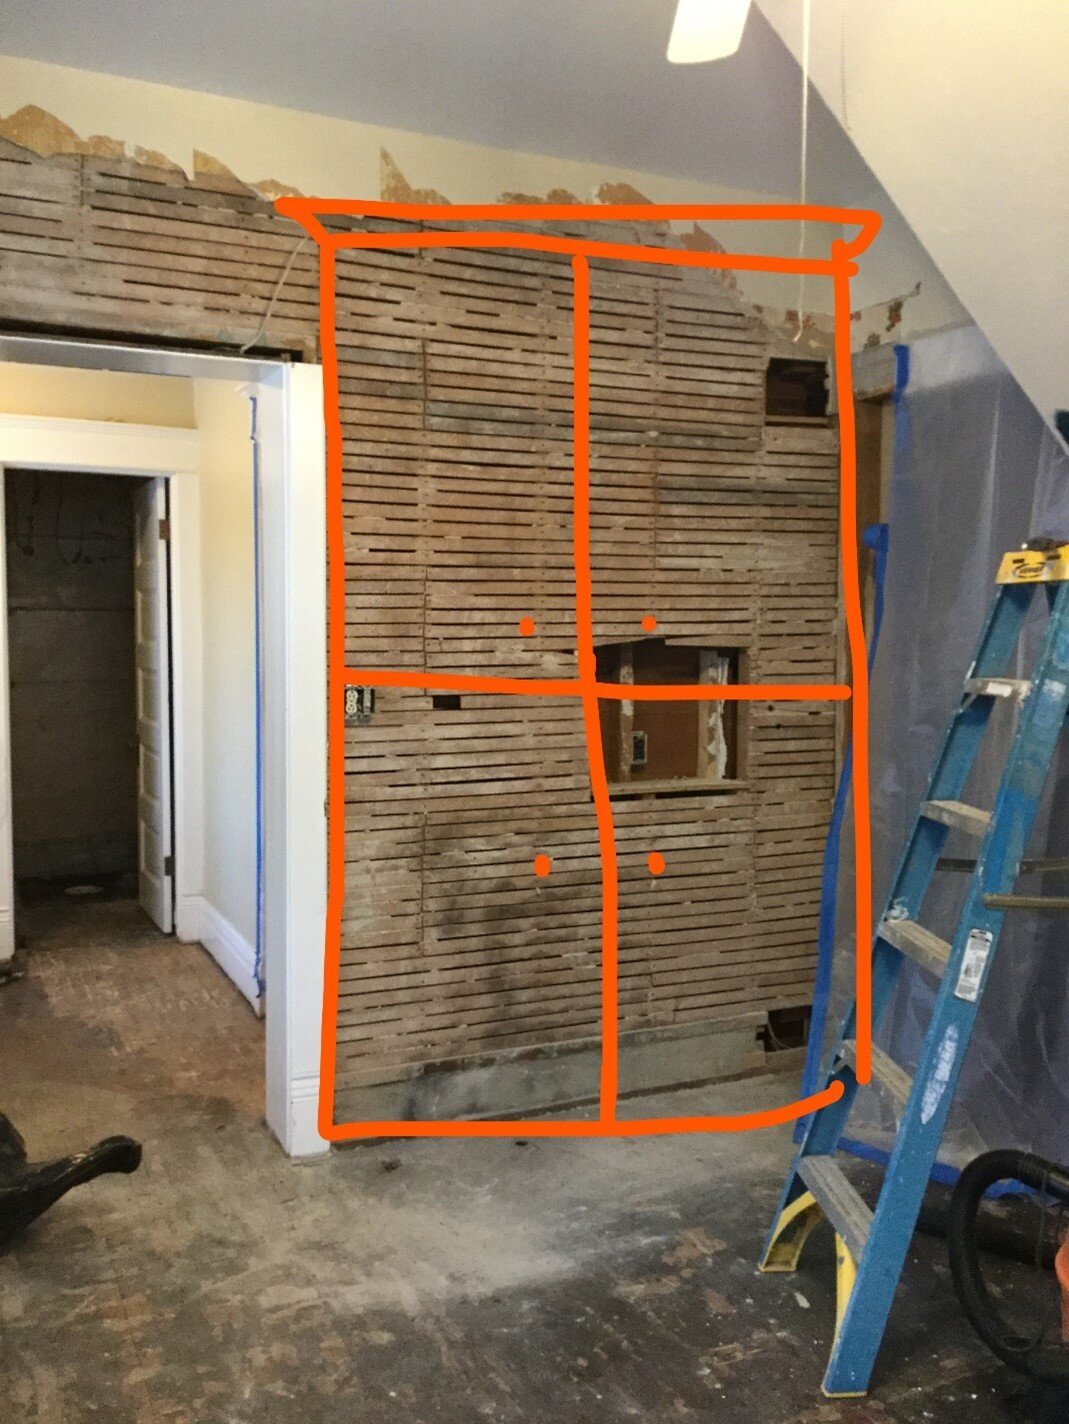
At the time we demolished the kitchen, we had a specific design in mind for the cabinets and shelving. On the left is the original kitchen chimney which serviced the original stove. It posed a design challenge because it couldn’t be removed except at great expense and with substantial repair to the exterior brick. We therefore had to build the counter around the chimney without it looking ridiculous, as it did when we moved in. So I designed a “hutch” that would sit on top of the counter and overlay the entire area to the left of the chimney and carry over on top of the chimney. There would be shelves on the left side of the hutch and shallow cabinets on the right which would “trick the eye” into believing the entire unit was flush to the wall. The red arrow on the right shows where we intended to build shelves. The green at the lower levels shows generally where we’d locate the drawers and corner lazy Susan unit.

To the right of the rear door, we planned the sink unit. The dishwasher would be on the left. We wanted a sink with an apron which is indicated under the window along with under-sink storage and drawers off to the right. There would be no cabinets or shelves here; the blue circles indicated where I’d put mirrored candle sconces Mike gave me for my birthday present in 2008 after we first met.
On the wall across from the hutch, we planned a shallow pantry. We knew at the time all the cabinets would be “fancy” in a decorative sense, with onlays and appliques and other flourishes, although we’d not yet agreed on a color. As it turned out, the cabinet bid we received was massively excessive, so Mike ended up building the cabinets himself and I painted them.

Next to the maid’s staircase and directly across from the back door, we’d put the Aga Heartland stove we purchased before moving to Michigan. The stove is a modern reproduction of a period stove from the early 1900’s.

In the butler’s pantry, we’d build a counter and beneath that, to the right, we’d install a beverage center. Large, deep drawers would carry off to the left. To the left of that, outside the frame, would be the refrigerator. The refrigerator and beverage center match the stove and came as part of a full suite that also included the dishwasher and a second refrigerator which we ended up putting in the basement.

This photo is taken from the direction adjacent to the drawers and beverage center in the last photo. The red box indicates where Mike would build an open cabinet to house the refrigerator. Both of us like the look of a built-in refrigerator as it gives kitchens a more finished and cohesive feel. This fit our overall design concept, which was for the cabinets to hint at the feel of furniture.
Demolition

Demo day! Admittedly, this was MOST EXCITING. But if I’d known then it would take 22 months to finish the kitchen rather than the 3-5 months we originally planned, I’d have been filled with dread.

Assisting Mike with the demolition was our friend and realtor, Greg Bosscher, and Mike’s two brothers, Greg and Todd.

Helpers in action.

We originally planned to have a contractor build the kitchen and contacted many in our local area with this in mind. Three quarters of them didn’t call us back. Of those who did, only a few showed up to assess the job. Of that small number, only one returned a bid. The bid was excessive, so we decided to do the work ourselves, EXCEPT for the cabinets and counters which we would have a subcontractor build. Or so we thought.

Mike has designed and built kitchens before, so this wasn’t his first rodeo (he’s not a builder or contractor by the way). I had never designed or built a kitchen before, so this would be my first rodeo.

By the end of the day on December 27, 2016, this is where we were. It was interesting and a little thrilling to get down to original building materials such as the lathe and, what mostly excited me, the original hardwood floors.

There also was wallpaper behind some of the upper cabinets, the geological layers of which told stories about past fads including this gem which reminded me of Chicken Little.

More old wallpaper.

Here we have Levi on an island of the last bit of tile which, as you can see, was installed over what likely was the original tile that overlay the wood floors.

The wood was covered with the nastiness of gunk and was punctured by 452 bazillion staples. It would take Mike and several hourly workers literally weeks to scrape these floors and remove all the staples.

Here we are the morning of December 28, 2016, thinking we’d have a new kitchen within the next 6 months (NOT!). We set up a temporary kitchen in the basement, which consisted of several picnic tables, a refrigerator/freezer, utility sink, toaster, and microwave.

As you can see, the original windows were significantly lower than a standard counter height. We didn’t alter the windows, so to this day they do dip below the counters and are a source of some chilly air during the winter.

Here’s a good view of the original wood floors, which we believe are beech. At the turn of the 19th/20th century, Cadillac was a booming lumber town and many homes in the historic district (and beyond) have vast amounts of the varied species that grew in the surrounding forests. Without a doubt, the most stunning of the original features in our home are the wood floors which span the entirety of the house. The only floors that aren’t designed with beautiful miter cuts are these (and those in the upstairs bathroom), as we believe they were covered with tile or alternatively because they were in a work space.
Progress

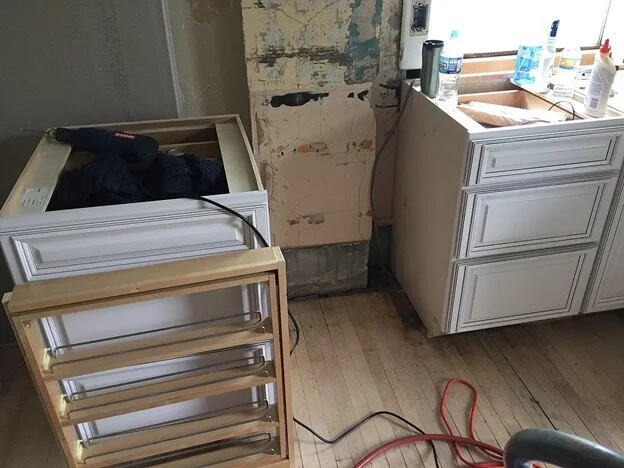
Mike owns and runs a business full time (a machine/broaching company), so he didn’t have the time (or inclination) to build custom cabinets during the wee hours left over for kitchen reno shenanigans. So we took a shortcut by purchasing plain white, ready-made cabinets which he’d cobble together into something much more special than what we unboxed.

Our house was a DIY construction zone on most days.

Cabinets literally were stacked everywhere along with debris of an assorted nature.

Cabinets are moved in and laid out generally where they’d end up.

Here Mike has been installing the wall boards.

Here is how the pantry started out.

In the meantime, we were tripping over materials and tools and lost many hammers in this debris field of cabinets and drawers.

We used the drawers for random storage of numerous paint samples and other tools.

The debris seemed endless. The debris WAS endless.
I had a few imperatives in this kitchen and pull out spice racks were one of them.

Me.

Mike.

This is the first group of cabinets mounted. You can see the spice rack pulls which will be hidden behind roped posts.

We opted for full posts rather than the half-rounds typically used in kitchens. They’re heavier but Mike weighted and adjusted them so they don’t sag and they look more substantial than the faux columns.

Here’s a close-up of the latching mechanism.

This May 27, 2017 picture shows progress on the pantry as well as the sink cabinet to the left. At this point, Mike has cased out the pantry which is now ready for crown molding and trim. As you can see, the lathe is now covered with wallboard and textured (Mike did all of this) and I’m experimenting with paint. Mike and I went around and around with the paint colors, for months on end, until he finally threw in the towel and let me have my way.

Now it’s June 24, 2016 and Mike’s finished adding the crown molding, plinths and reeded columns to the pantry. You can see the plan taking shape! He’s also rebuilt crossheads over the doors to the right and the left, as these were removed many years ago when the kitchen was last remodeled. We also have swathes of purple paint flanking the pantry, which is one of the colors Mike and I loosely agreed upon. I say “loosely” because it was a compromise and not what I wanted in the first place. We ended up ditching the purple shortly after I started painting. We have gallons of it in the basement, along with many other ill-fated colors.

Here we are, also in June, with a full bank of cabinets and the support for a counter.

The kitchen entry wasn’t large enough to bring in the corner cabinet, so Mike had to cut it out with a Sawzall.

In the meantime, I was sampling every color in the full light spectrum.

By June 2017, our dishwasher was inside the sink cabinet which Mike buit. Of course, we still didn’t have a sink or running water, but it was nice to have the illusion of progress. The dishwasher, refrigerator, beverage center and stove are all this cranberry red color, which threw us hard on the color choices. It was difficult to find colors that worked with cranberry and which we could agree upon. Mike really wanted to pair it with black, but I felt this was too dark for the kitchen given most of our house is very dark. A soft celery or seafoam green was a close runner up to what we ended up choosing.

In the meantime, the sink arrived in early June. I did go back and forth in regard to the copper, because our appliance trim is nickel and our faucet, ultimately, was brass. After much thought, we decided there’s nothing wrong with mixing metals and, in fact, it gives the kitchen more of a timeless, evolved feel and less of a rigid “matchy-matchy” vibe.

Here we are in July 2017 with visible progress and the brass Perrin & Rowe faucet installed.

We also had a Perrin & Rowe faucet at our prior house and while it needed replacement parts more than once, the customer service at Rohl is outstanding so we decided to do it again.

Initially Mike and I thought about installing Calcutta counters, but the price quoted by the local fabricator was daunting. I had been pushing for wood in keeping with the furniture feel of the space, and Mike finally relented. We chose wide-plank walnut as the material, which is pictured here in early July 2017.

Here is Mike’s measure for the radius cut of where the two sections meet over the lazy Susan corner.

Here’s the slab cut and attached to the corner run.

Mike spent a little time on YouTube and figured out how to edge the counter. You can see here the cut out for the wonky chimney and, as you look further to the right, for the window casing and window.

Here is the sink side before he cut the edge detail.

And here it is almost ready to install.

Here we are on July 14, 2017 and Mike has applied polyurethane to the counters. I wanted to leave the counters as is and let them wear and age naturally, but Mike wanted epoxy counters. He would regret this almost immediately.

Mike did gorgeous detail work on the counters.

Here’s the sink counter ready for installation.

Pretty much the only thing that went right with the epoxy was this initial test on a wood scrap. What Mike was soon to learn, however, is if you don’t follow every single instruction for mixing and pouring the epoxy, it will not cure right, and you will have to sand and reapply it.

Of course, we also had to mask off the areas where epoxy would run, although we didn’t anticipate it

Epoxy filling the sink.

Here’s Mike after the first epoxy pour with the map gas blow torch which he used to take bubbles out of the epoxy.

The epoxy turned out beautiful, initially, but not without a great deal of headache and several “redo” pours. It definitely has not worn well, and is susceptible to scratches, indents, and requires cutting boards to be scattered about as landing spots for anything too warm.

Once the counters were finished, Mike could start on the hutch which would sit on top.

Here Mike has installed the cabinet, framed it out, and put up beadboard to form the back of the hutch.

At this point, you can see the hutch’s form taking shape.

Here’s the hutch status on August 20, 2017. Mike also trimmed this out with reeded columns and crown.

By August 2, 2017, Mike finally agreed to the colors I wanted all along in the kitchen, which were a soft peachy pink and a rich carrot orange. The colors are Pink Ground and Charlotte’s Locks, both by Farrow and Ball. The ended up being a great choice for the room, which gathers light from the northwest and northeast, as the room now casts a gorgeous warm glow which is uplifting and beautiful to behold. The oddball jags on the ceiling are my estimation of where the ceiling moldings would go.

While this work was ongoing, we were trying to use the kitchen as much as we could. As of the time we took this picture in early August 2017, we still didn’t have a refrigerator or stove in the kitchen, so I was using the grill out back and the microwave in the basement to cook.

The kitchen colors were inspired by a MacKenzie-Childs bouquet in the “Sunburst” color scheme. Without intentionally planning it, the end result of this kitchen does have a slight MacKenzie-Childs vibe.

In this August 27, 2017 photo, Mike and his brother Greg are installing the ceiling trim. We bought all the trim, molding, appliques and onlays online through Architectural Depot.

Before installing the ceiling trim, we took the pieces to Mike’s shop and he sprayed them. This seemed infinitely preferable to me cutting in with three coats of gold paint on narrow but ornate trim.

The metallic gold we chose for the kitchen trim and accents is Pharaoh’s Gold by Modern Masters.

One of the most exciting days of the kitchen renovation series was on September 5, 2017 when we unboxed the beautiful Heartland stove which had been sitting in storage at Mike’s shop for a year and a half.

And here she is with a few missing parts. Fortunately, Aga’s North American plant is here in Michigan, so I was able to drive less than two hours and get everything we needed (because we bought the suite from a kitchen showroom “as is” and deeply discounted on eBay, a few things were missing but not insurmountably so). Sadly, Aga doesn’t male the Heartland line anymore.

Here’s Mike in October 2017 getting ready to spray the pantry. We sprayed as much as we could and then I hand painted the portions of the cabinet banks that house the drawers.

Paint drifted everywhere.

Because the stove was in at this point, I was using the kitchen for cooking. But the constant process of having to set up and undo everything and then rewind and repeat in order to move forward with the work was very simply a giant pain in the ass.

Here are the pantry and hutch doors at Mike’s shop where we took them to spray.

By October 2, 2016, Mike had sprayed the pantry and other cabinets in the kitchen.

To give the pantry more grandeur and the feel of furniture, we attached appliques to the otherwise plain doors. These are by Pearlworks.

I shopped the cabinet hardware and found the best prices on the Houzz website. These bejeweled pulls are called “Portofino” and also are available at House of Antique Hardware.

Not finished, but so much better than its white box beginnings.

Here we are on October 6, 2017 and as you can see, I’ve painted the beadboard yellow. We wanted an accent color for sections of the ceiling and the back of the hutch and yellow was our first choice. We then veered to a soft blue green as the accent color, and here I’m testing that on the beadboard.

A glimpse of the yellow that was originally going to be the accent color before we segued to the pale blue/green.

There was a lot of painting and repainting on the ceiling as I worked to get the colors just right. The blue/green we ultimately decided to use as the accent color is Benjamin Moore’s Tranquility which is in the Affinity line.

Mike decided after we nailed up the decorative molding on the staircase bump that he wanted this area painted blue/green, so I did a lot of detail work here because the paint took several coats for complete coverage.

Next on the agenda were the spice rack columns, which Mike sprayed and then I detail painted with metallic gold.

Tedious doesn’t begin to describe it. Moreover, because the falls and winters here are so dark and the interior lighting cast shadows everywhere, I had to paint with a flashlight in one hand and a paint brush in the other to get crisp cut lines.

Once we decided on the blue/green for the accent color, I revisited the color of the beadboard and tried to match the cranberry of the appliances for this detail. The color was not matchable, so I mixed my own color which is as close as we could get.

Here we are in December 2017, one year after demolition. We still have a long way to go (including the backsplash, the entire butler’s pantry, the doors, the floor, finished detail painting, etc.), but the beauty of this kitchen was slowly unfolding.

Now it’s time for the backsplash. Mike bought a new tile saw for this project, which we knew we’d need also for the upstairs bathroom renovation which would occur a couple years later.

Here we have the quarter round frame installed along with the tile and spacers. And some lettuce. With wine. Typical scene during this time.

Ta dah. Backsplash is done.

Next up are the upper shelves which will be cut from the same walnut slabs as the counters. Here, Mike has cut a paper template printed from AutoCad.

After tracing the template, the shelves are ready to cut.

First cut, ready for sanding and shaping.

Here the ogee edge is added.

Wisely, we decided there would be no epoxy on the shelves. Mike stained them and applied polyurethane.

Mike sprayed the corbels and I painted the gold detail.

I didn’t apply a top coat after painting these but should have, as they’ve since patinaed more than I would’ve liked.

Once the painting was complete, Mike custom made brackets to anchor these massive corbels to the brick walls.

The bracket top will be hidden behind the shelves.
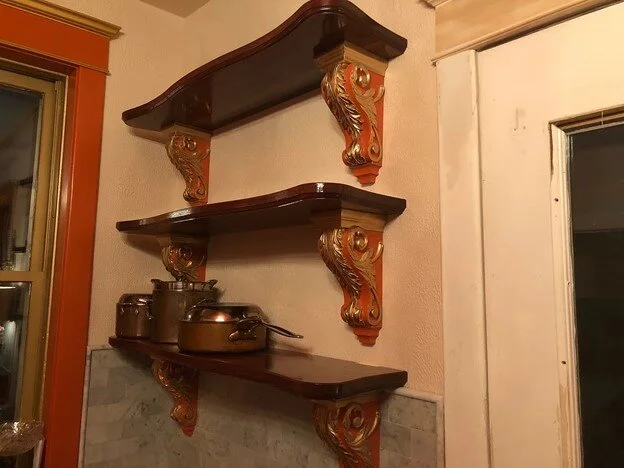
And the shelves are up. They are secure enough to hold all of our copper pots and the weight of a person.

In February 2018, we stopped work on the kitchen to work on the powder room adjacent to the butler’s pantry. Here’s Mike in April 2018 working on the butler pantry window. You can see progress in the powder room including completion of the paneling, floors and sink backsplash.
Here we are in April 2018 resuming work on the kitchen with Mike’s new table saw.

By May 26, 2018, the butler’s pantry drawers and counter are installed. The opening to the right is for the beverage center.

Here’s the reverse view showing the refrigerator cabinet framed out.

This is the view looking into the butler’s pantry from the den (i.e. the home’s original dining room).

Here’s the butler’s pantry at the end of May 2018 with the counters ready for the epoxy pour. As you can see, the powder room is complete.

There were far fewer glitches with the epoxy in the butler’s pantry.

This June 17, 2018 photo shows progress painting the refrigerator cabinet with the kitchen in the background. We decided to install tin on the butler’s pantry ceiling rather than rebuild and drywall the ceiling because tin is far easier to install and much prettier. The vintage ram’s head chandelier we found on eBay.

With the finish line more or less in sight, I turned my eye towards décor for the kitchen. I didn’t want much in the way of wall décor, but I did fall for this reverse painted glass sign which I found at an antique store in Traverse City.

In June 2018, a few months before we finished the kitchen, I posted this picture on Facebook. It was my first social media post of this space.

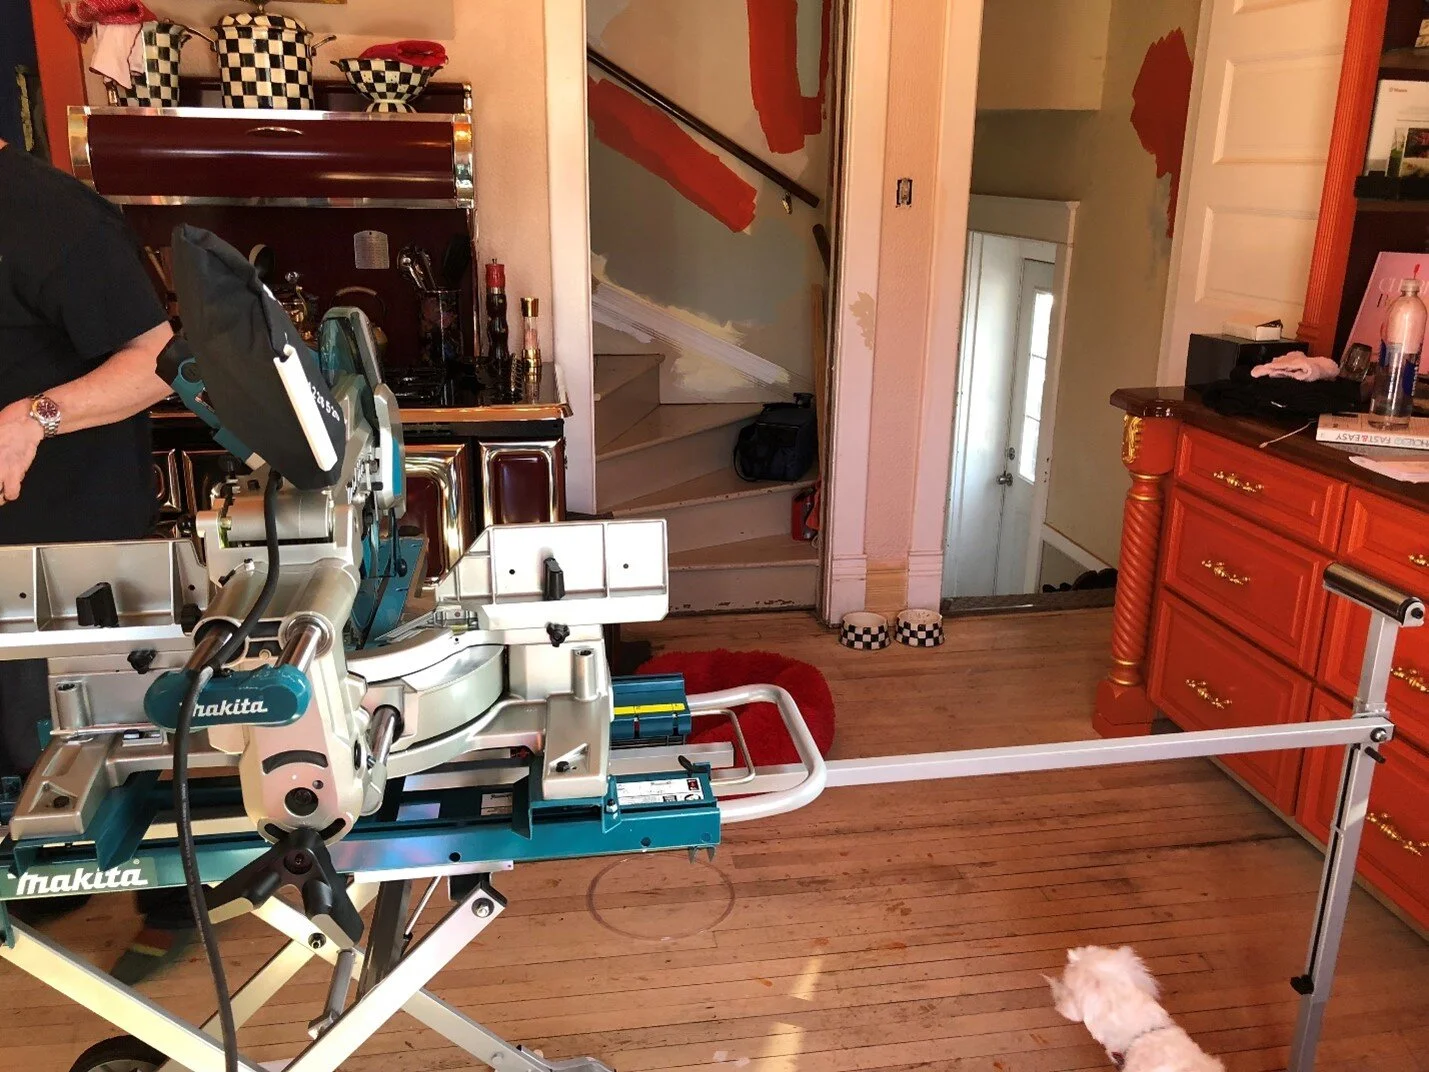
Back to reality, here is what was going on to the left of the previous shot. Mike is repairing loose steps in the maid’s staircase before installing the carpet.

This shows the maid’s staircase ready for me to paint the baseboard with a view towards the basement stairs to the right.

For the carpet, we chose area rugs by KAS which Mike cut and installed piece-by-piece on the treads and risers.

We highly recommend using area rugs to carpet a tight and winding space. We love the look, which we could never achieve with a standard run of carpet.

Now we’re ready for the new handrail in the maid’s staircase. Mike angled it to follow the wall.

Here’s the handrail finished and ready to install.

Handrail is installed. The brackets are from House of Antique Hardware. The art consists of reproduction Art Deco period Homer Conant prints.
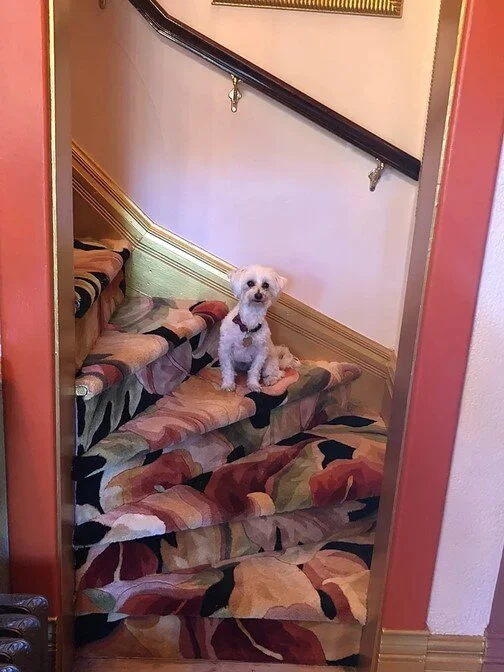
Ta dah!

Next on the agenda was sanding and repainting the door between the butler’s pantry and the bathroom. We believe this originally was the door leading from the kitchen to the maid’s staircase. For the most part, painting throughout this project was my job.

Finally, in July 2018, we were ready to paint the floors. We originally wanted to install black and white checkerboard tiles using marble and granite, but shifted to a hand-painted floor. I felt this was more in keeping with the warmth of the wood counters and kept the kitchen from becoming too polished.

Mike had already completely sanded the floors, so the next step was to roll out primer. For primer and paint, we used products specifically designed for porches and floors.

Here we have the primer completed. Ultimately, we applied two coats of paint over this primer.

Next, Mike laid out the squares on AutoCAD to make sure they flowed correctly throughout the space. He then drew them out with a pencil and I began the laborious process of painting them. I chose not to use tape and instead cut the squares using a 1.5 inch Purdy ClearCut brush.

For the edge details, I used Modern Masters metallic gold.

I created a trompe ‘loeil threshold and stenciled a French Bee on it. Originally, I wanted to stencil a bee at each square corner, but Mike thought it would be too busy. I then wanted to stencil fleur de lys in each black square, but again, Mike thought it would be “too much.”

Let me just say for the record that painting this floor was TEDIOUS because, after I painted each black square, I had to go back and cut in with a second coat of black. Here I am down to the very last square.

Here we are on July 27, 2018, and I’ve finally finished painting the squares. It took me 12 days alone just to paint these in the kitchen and butler’s pantry (and I was painting for about 6-7 hours a day). The next step was to pour the polyurethane which, as you will see, was a bleeping disaster.

Needless to say, we screwed up the poly pour badly. Puddles formed everywhere, plus the dog breached barricade during the pour and walked all over the place, leaving a trail of puppy prints across the floor which were followed by my foot prints due to giving chase.

Here we have arrows indicating the many problem areas left after the poly dried, which included large yellow-y, resin-y clumps all over the floor.

Here’s a closer shot of a problem area after the floor completely dried. These ugly splotches were ALL OVER the floor and were hardened to the point the entire floor would need to be sanded down almost completely to the wood to get rid of them.

To make a long story short, eff words were said. Mike wanted me to redo the entire floor, but I declined, and instead opted to start whacking at it with the orbital sander. To our surprise, we liked the resulting distressed look.

Not being one to let a crisis go to waste, I re-pitched my fleur de lys idea to Mike who, by this time, was beaten down by the experience enough to give in.

For the fleur de lys, I applied a liberal amount of adhesive to the stencils to get a tight seal and then used Liquid Leaf paint. By using Liquid Leaf, which is oil based, I avoided having to paint a second and third coat of gold as I would have needed to do to get an opaque look if I used a water-based paint. I then painted 7-8 coats of a water-based clear paint as a top coat.

In total, the distressing, stenciling and top coat took another two weeks to complete. On the whole, the floors have held up brilliantly although they look more distressed now than in this picture (which I took upon completion). We don’t mind the dulling of the top coat, dings or discoloration that has occurred in the two years since we finished the floors, as this is in keeping with the overall distressed look.

This photo is taken at the threshold between the butler’s pantry and den. I’m very happy we have the original wood floors exposed in the kitchen, even if they’re painted over.

This is the threshold leading into the bathroom.

Here’s a reminder of what the floors looked like after we pulled up the tile and Mike began the back-breaking process of scraping, sanding and removing staples.

By the end of October 2018, we were down to the final step of the kitchen renovation, which was to paint the stair hall leading to the basement and the side door leading outside. Although we won’t be redoing the carpet in this area until we’re further down the road with our projects, we wanted the stairhall painted because this door is always open and this vista is visible from the kitchen.

Here we have the stair hall almost completed with a sample swath of gold paint.

And, here are the walls complete with gold paint, plus a winter boot line up on the stairs.